How to upgrade provider license?

[et_pb_section fb_built=”1″ _builder_version=”4.20.4″ _module_preset=”default” global_colors_info=”{}”][et_pb_row _builder_version=”4.20.4″ _module_preset=”default” global_colors_info=”{}”][et_pb_column type=”4_4″ _builder_version=”4.20.4″ _module_preset=”default” global_colors_info=”{}”][et_pb_text _builder_version=”4.20.4″ _module_preset=”default” global_colors_info=”{}”]

In this article you will see how to upgrade provider license. The provider license can be upraded from 50 users to 100,250,500,1000 or 2000 or you can add small or large number of licenses to your current license. The number of the licenses which you can add to your current license depends of the license that you have.

Please note when upgrading that you will be billed pro-rata (for the remaining time until next payment is due) based on your original provider package’s pricing.

Depending on remaining days and region – sometimes upgrade may not be possible on the same day and upgrade buttons may not appear if the upgrade price is below 7 eur.


How to upgrade provider license:

  • Go to our website and click on my profile icon (shown below) and then click on My Licenses

[/et_pb_text][et_pb_image src=”https://www.smart-stb.net/wp-content/uploads/2022/05/My_licenses__.png” title_text=”My_licenses__” _builder_version=”4.20.4″ _module_preset=”default” global_colors_info=”{}”][/et_pb_image][et_pb_text _builder_version=”4.20.4″ _module_preset=”default” global_colors_info=”{}”]

  • Login to your account if you are not already.

[/et_pb_text][et_pb_image src=”https://www.smart-stb.net/wp-content/uploads/2022/04/login.png” title_text=”login” _builder_version=”4.20.4″ _module_preset=”default” global_colors_info=”{}”][/et_pb_image][et_pb_text _builder_version=”4.20.4″ _module_preset=”default” global_colors_info=”{}”]

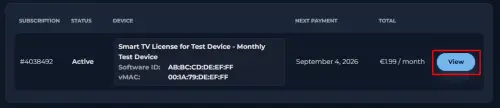
  • When you log to our website and choose “My Licenses” you will see all license that you have in your account. Please choose your provider license. Check the picture below.

[/et_pb_text][et_pb_image src=”https://www.smart-stb.net/wp-content/uploads/2022/09/select_license.png” title_text=”select_license” _builder_version=”4.20.4″ _module_preset=”default” global_colors_info=”{}”][/et_pb_image][et_pb_text _builder_version=”4.20.4″ _module_preset=”default” global_colors_info=”{}”]

(Example, information on above picture is for demonstration purposes, please do NOT enter this on our site!)

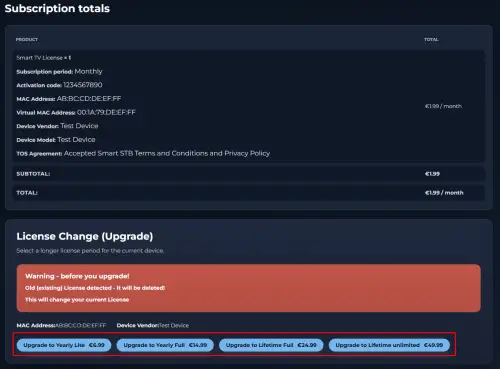
When you open your subscription, please scroll down and find the upgrade buttons.

Choose the license to which you want to upgrade. If your current license is for 50 users, you will be able to upgrade to 100,250,500,1000 or 2000 users.

Please note when upgrading the license, all users which you have added in your provider license will be moved to your new upgraded provider license, no users will be lost or deleted.

[/et_pb_text][et_pb_image src=”https://www.smart-stb.net/wp-content/uploads/2023/04/upgrade_license_new.png” title_text=”upgrade_license_new” _builder_version=”4.20.4″ _module_preset=”default” global_colors_info=”{}”][/et_pb_image][et_pb_text _builder_version=”4.20.4″ _module_preset=”default” global_colors_info=”{}”]

(Example, information on above picture is for demonstration purposes, please do NOT enter this on our site!)

Please note when upgrading that you will be billed pro-rata (for the remaining time until next payment is due) based on your original provider package’s pricing.

Depending on remaining days and region – sometimes upgrade may not be possible on the same day and upgrade buttons may not appear if the upgrade price is below 7 eur.

When you select the license to which you want to upgrade you need to follow the instructions to upgrade your license.

Please check all data and accept our TOS Agreement.

[/et_pb_text][et_pb_image src=”https://www.smart-stb.net/wp-content/uploads/2023/04/upgrade-license-1-1_new.png” title_text=”upgrade license 1-1_new” align=”center” _builder_version=”4.20.4″ _module_preset=”default” global_colors_info=”{}”][/et_pb_image][et_pb_text _builder_version=”4.20.4″ _module_preset=”default” global_colors_info=”{}”]

(Example, information on above picture is for demonstration purposes, please do NOT enter this on our site!)

Select Sign up now.

[/et_pb_text][et_pb_image src=”https://www.smart-stb.net/wp-content/uploads/2023/04/upgrade-license-2_new.png” title_text=”upgrade license 2_new” align=”center” _builder_version=”4.20.4″ _module_preset=”default” global_colors_info=”{}”][/et_pb_image][et_pb_text _builder_version=”4.20.4″ _module_preset=”default” global_colors_info=”{}”]

(Example, information on above picture is for demonstration purposes, please do NOT enter this on our site!)

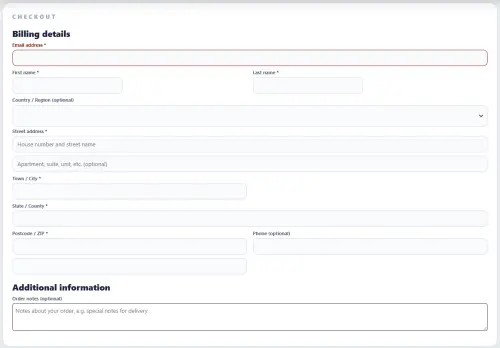
Check billing details. If needed correct the billing details.

[/et_pb_text][et_pb_image src=”https://www.smart-stb.net/wp-content/uploads/2023/04/Upgrade-license-3_1.png” title_text=”Upgrade license 3_1″ _builder_version=”4.20.4″ _module_preset=”default” global_colors_info=”{}”][/et_pb_image][et_pb_text _builder_version=”4.20.4″ _module_preset=”default” global_colors_info=”{}”]

Choose payment method.

You can choose between Credit Card (Braintree), PayPal, Google Pay and Apple Pay.

If you want to use Google Pay or Apple Pay, please make sure that you have added a valid payment method in Google Pay/Apple Pay.

If you purchase the license from your PC and want to use Apple Pay then you need to use Safari browser on macOS.

Then select Sign up now.

[/et_pb_text][et_pb_image src=”https://www.smart-stb.net/wp-content/uploads/2023/04/upgrade-license-3_2.png” title_text=”upgrade license 3_2″ _builder_version=”4.20.4″ _module_preset=”default” global_colors_info=”{}”][/et_pb_image][et_pb_text _builder_version=”4.20.4″ _module_preset=”default” global_colors_info=”{}”]

(Example, information on above picture is for demonstration purposes, please do NOT enter this on our site!)

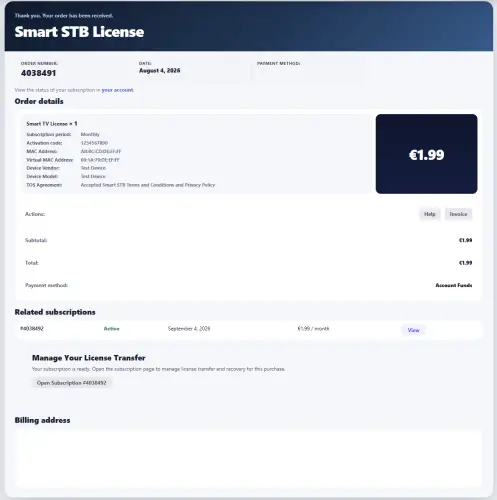
If everything is correct you will see information about the order which was created.

[/et_pb_text][et_pb_image src=”https://www.smart-stb.net/wp-content/uploads/2023/04/upgrade-license-4-1.png” title_text=”upgrade license 4-1″ _builder_version=”4.20.4″ _module_preset=”default” global_colors_info=”{}”][/et_pb_image][et_pb_text _builder_version=”4.20.4″ _module_preset=”default” global_colors_info=”{}”]

(Example, information on above picture is for demonstration purposes, please do NOT enter this on our site!)

How to add more licenses to your provider license

If you want to add a small or large number of licenses to your current license, plaese check the instructions below:

Find the license to which you want to add more licenses and choose it.

Then scroll down and find the upgrade buttons. We have marked the buttons with which you can add more licenses with red rectangle. Select the amonth of the license which you want to add to your current license.

The number of the licenses which you can add to your current license depends of the license that you have.

[/et_pb_text][et_pb_image src=”https://www.smart-stb.net/wp-content/uploads/2023/04/add_licenses_new.png” title_text=”add_licenses_new” _builder_version=”4.20.4″ _module_preset=”default” global_colors_info=”{}”][/et_pb_image][et_pb_text _builder_version=”4.20.4″ _module_preset=”default” global_colors_info=”{}”]

(Example, information on above picture is for demonstration purposes, please do NOT enter this on our site!)

Please note when upgrading that you will be billed pro-rata (for the remaining time until next payment is due) based on your original provider package’s pricing.

Depending on remaining days and region – sometimes upgrade may not be possible on the same day and upgrade buttons may not appear if the upgrade price is below 7 eur.

Check billing details. If needed correct the billing details.


[/et_pb_text][et_pb_image src=”https://www.smart-stb.net/wp-content/uploads/2023/04/add-license-2.png” title_text=”add license 2″ _builder_version=”4.20.4″ _module_preset=”default” global_colors_info=”{}”][/et_pb_image][et_pb_text _builder_version=”4.20.4″ _module_preset=”default” global_colors_info=”{}”]

Choose payment method.

You can choose between Credit Card (Braintree), PayPal, Google Pay and Apple Pay.

If you want to use Google Pay or Apple Pay, please make sure that you have added a valid payment method in Google Pay/Apple Pay.

If you purchase the license from your PC and want to use Apple Pay then you need to use Safari browser on macOS.

Then select Place order.

[/et_pb_text][et_pb_image src=”https://www.smart-stb.net/wp-content/uploads/2023/04/add-licenses-3.png” title_text=”add licenses 3″ _builder_version=”4.20.4″ _module_preset=”default” global_colors_info=”{}”][/et_pb_image][et_pb_text _builder_version=”4.20.4″ _module_preset=”default” global_colors_info=”{}”]

(Example, information on above picture is for demonstration purposes, please do NOT enter this on our site!)

If everything is correct you will see information about the order which was created.

[/et_pb_text][et_pb_image src=”https://www.smart-stb.net/wp-content/uploads/2023/04/add-licenses-4.png” title_text=”add licenses 4″ _builder_version=”4.20.4″ _module_preset=”default” global_colors_info=”{}”][/et_pb_image][et_pb_text _builder_version=”4.20.4″ _module_preset=”default” hover_enabled=”0″ sticky_enabled=”0″]

(Example, information on above picture is for demonstration purposes, please do NOT enter this on our site!)

[/et_pb_text][/et_pb_column][/et_pb_row][/et_pb_section]
How to use provider license.

[et_pb_section fb_built=”1″ _builder_version=”4.18.0″ _module_preset=”default” global_colors_info=”{}”][et_pb_row _builder_version=”4.18.0″ _module_preset=”default” global_colors_info=”{}”][et_pb_column type=”4_4″ _builder_version=”4.18.0″ _module_preset=”default” global_colors_info=”{}”][et_pb_text _builder_version=”4.18.0″ _module_preset=”default” global_colors_info=”{}”]

In this article we will show you how to use your provider license.

We will give you a special link to buy a provider license.

To get provider license you need to open ticket and let us know that you want to be a provider.

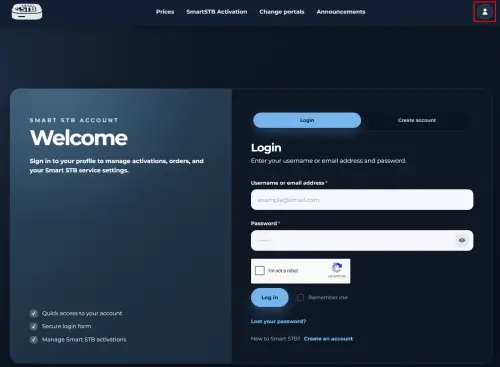
First you need to log to our website.  If you do not know how, please check the picture below.

[/et_pb_text][et_pb_image src=”https://www.smart-stb.net/wp-content/uploads/2022/07/user_icon_log_in.png” title_text=”user_icon_log_in” _builder_version=”4.18.0″ _module_preset=”default” global_colors_info=”{}”][/et_pb_image][et_pb_text _builder_version=”4.18.0″ _module_preset=”default” global_colors_info=”{}”]

When you log to our website and choose “My Licenses” you will see all license that you have in your account.

Please choose your provider license. Check the picture below.

[/et_pb_text][et_pb_image src=”https://www.smart-stb.net/wp-content/uploads/2022/09/select_license.png” title_text=”select_license” _builder_version=”4.18.0″ _module_preset=”default” global_colors_info=”{}”][/et_pb_image][et_pb_text _builder_version=”4.18.0″ _module_preset=”default” global_colors_info=”{}”]

(Example, information on above picture is for demonstration purposes, please do NOT enter this on our site!)

When open your subscription you can add or change Portal URL, add device by software ID. You can also set notes to the devices.

If you want to add or change portal URL, please check the picture below. We marked with red rectangular the box in who you need to add portal URL. If you want to change portal URL, just correct the Portal URL and then click on button “Add/Change”.

[/et_pb_text][et_pb_image src=”https://www.smart-stb.net/wp-content/uploads/2022/09/change-portal.png” title_text=”change portal” _builder_version=”4.18.0″ _module_preset=”default” global_colors_info=”{}”][/et_pb_image][et_pb_text _builder_version=”4.18.0″ _module_preset=”default” hover_enabled=”0″ global_colors_info=”{}” sticky_enabled=”0″]

(Example, information on above picture is for demonstration purposes, please do NOT enter this on our site!)

If you want to add device, please check the picture below.

You need to add Device’s Software ID in the grey box. As we mentioned above you can set notes to device that you add.

In the picture below software ID is “11:11:11:11:11:11” and note is “Test Device”.

[/et_pb_text][et_pb_image src=”https://www.smart-stb.net/wp-content/uploads/2022/09/add-device.png” title_text=”add device” _builder_version=”4.18.0″ _module_preset=”default” global_colors_info=”{}”][/et_pb_image][et_pb_text _builder_version=”4.18.0″ _module_preset=”default” global_colors_info=”{}”]

(Example, information on above picture is for demonstration purposes, please do NOT enter this on our site!)

When you add Device your device will be added to the table with devices. Please check the picture below.

[/et_pb_text][et_pb_image src=”https://www.smart-stb.net/wp-content/uploads/2022/09/device-table.png” title_text=”device table” _builder_version=”4.18.0″ _module_preset=”default” global_colors_info=”{}”][/et_pb_image][et_pb_text _builder_version=”4.18.0″ _module_preset=”default” hover_enabled=”0″ global_colors_info=”{}” sticky_enabled=”0″]

(Example, information on above picture is for demonstration purposes, please do NOT enter this on our site!)

If you want to edit device notes, please click on the software ID of the device that you want to change.

Please see the pictures below.

[/et_pb_text][et_pb_image src=”https://www.smart-stb.net/wp-content/uploads/2022/09/edit-notes.png” title_text=”edit notes” _builder_version=”4.18.0″ _module_preset=”default” global_colors_info=”{}”][/et_pb_image][et_pb_text _builder_version=”4.18.0″ _module_preset=”default” global_colors_info=”{}”]

(Example, information on above picture is for demonstration purposes, please do NOT enter this on our site!)

When you choose your device you will see this. Please see picture below.

You can add or change device note by add or change text in the grey box. After make changes do not forget to choose button “Edit”.

[/et_pb_text][et_pb_image src=”https://www.smart-stb.net/wp-content/uploads/2022/09/edit-notes-2.png” title_text=”edit notes 2″ _builder_version=”4.18.0″ _module_preset=”default” global_colors_info=”{}”][/et_pb_image][et_pb_text _builder_version=”4.18.0″ _module_preset=”default” global_colors_info=”{}”]

(Example, information on above picture is for demonstration purposes, please do NOT enter this on our site!)

If you want to delete device from your provider license you need to press “X” button. Please check the picture below. We are marked this button with red rectangular.

[/et_pb_text][et_pb_image src=”https://www.smart-stb.net/wp-content/uploads/2022/09/delete.png” title_text=”delete” _builder_version=”4.18.0″ _module_preset=”default” global_colors_info=”{}”][/et_pb_image][et_pb_text _builder_version=”4.18.0″ _module_preset=”default” global_colors_info=”{}”]

(Example, information on above picture is for demonstration purposes, please do NOT enter this on our site!)

If you want to search for device in your provider license you need to use “Search for device” option.

You can search for device with software ID, virtual MAC address or device notes.

Please chek the picture below.

[/et_pb_text][et_pb_image src=”https://www.smart-stb.net/wp-content/uploads/2022/09/search.png” title_text=”search” _builder_version=”4.18.0″ _module_preset=”default” global_colors_info=”{}”][/et_pb_image][et_pb_text _builder_version=”4.18.0″ _module_preset=”default” global_colors_info=”{}”]

(Example, information on above picture is for demonstration purposes, please do NOT enter this on our site!)

[/et_pb_text][/et_pb_column][/et_pb_row][/et_pb_section]

How to get trial license

[et_pb_section fb_built=”1″ _builder_version=”4.17.4″ _module_preset=”default” global_colors_info=”{}”][et_pb_row _builder_version=”4.17.4″ _module_preset=”default” global_colors_info=”{}”][et_pb_column type=”4_4″ _builder_version=”4.17.4″ _module_preset=”default” global_colors_info=”{}”][et_pb_text _builder_version=”4.17.4″ _module_preset=”default” global_colors_info=”{}”]

You can get trial license via our website following the steps below or via our application.

To get trial license for the app you need to start the app for the first time and then accept our Terms of Service.

More infomation about how to get trial license via app: https://www.smart-stb.net/knowledge-base/how-to-activate-the-app/

You can get 1 trial from our application (when it’s first started) and up to 2 more trials from our website 7 days after the last trial.

If you get trial period from the app and license expire you can get trial from our website without waiting 7-days. Please check the steps below.

If you get trial period from website you need to wait 7-days to be able to get new 7-day trial. Please check the steps for how to reactivate trial.

How to get trial license 

You need to go to our site and locate and click on “My Account” icon and then login on our website if you are not logged.

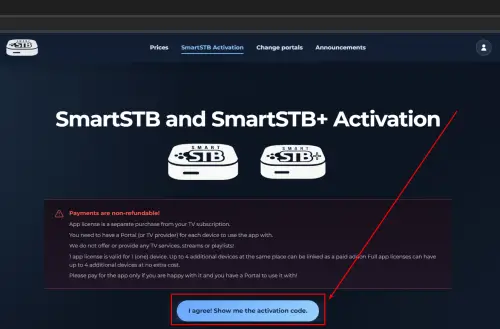
Then click on “Smart STB Activation”.

When you choose SMART STB Activation you will see this picture:

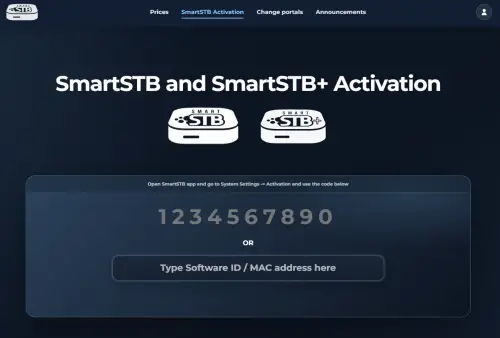
Please read the message which was marked with the red rectangle and if you agree with it click on button “I aggree! Show me the activation code.”. After pressed the button, the field with the 10 digit activation code and field in which you can enter your software ID will be showed. We have marked the button with black rectangular (see the picture abowe). When you click on this button you will see this page:

Picture above is an example.

[/et_pb_text][et_pb_text _builder_version=”4.17.4″ _module_preset=”default” global_colors_info=”{}”]

When you see this picture, you need to enter activation code in the app on your device

-or-

you need to enter Software ID in our site.

You can activate via activation code –or– via software ID.
Use this method that is easier for you.

Please note that you can find your Software ID in “Device Info” menu, choose portal menu or in demo portal.

Pictures below are an example and not a real device.

[/et_pb_text][et_pb_image src=”https://www.smart-stb.net/wp-content/uploads/2022/07/trial_menu.png” title_text=”trial_menu” _builder_version=”4.17.4″ _module_preset=”default” global_colors_info=”{}”][/et_pb_image][et_pb_image src=”https://www.smart-stb.net/wp-content/uploads/2022/07/trial_dev_info.png” title_text=”trial_dev_info” _builder_version=”4.17.4″ _module_preset=”default” global_colors_info=”{}”][/et_pb_image][et_pb_image src=”https://www.smart-stb.net/wp-content/uploads/2022/07/trial_demo.png” title_text=”trial_demo” _builder_version=”4.17.4″ _module_preset=”default” global_colors_info=”{}”][/et_pb_image][et_pb_text _builder_version=”4.17.4″ _module_preset=”default” global_colors_info=”{}”]

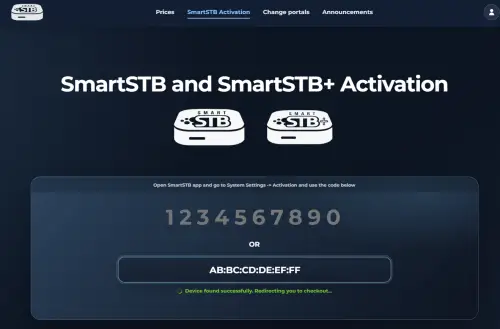
When you entered a valid activation code in app on your device or software ID in our site you will see something like this on our website:

Pictures above are an example, and device is not real.

When you see picture like above, then you need to follow the steps to get trial license.

Step 1: Enter your billing address information

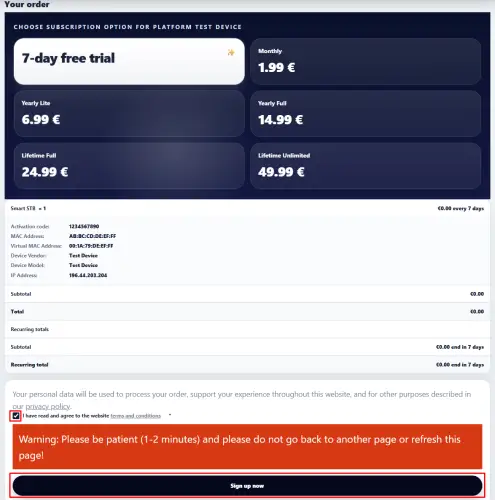
Step 2: Choose 7 day-free trial license, agree with the Terms and conditions and click on “Sign up now” button.

Picture above is an example, and not a real device.

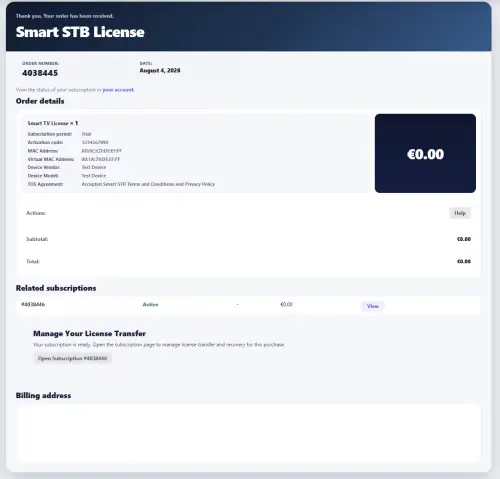
Step 3: When you see this picture you complete your order and get trial license.

Picture below is an example, and not a real device.

How to reactivate trial license

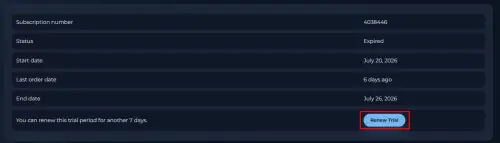
When trial license expires and you want to get new 7-day trial, please follow the instructions.

Please note a trial license can be reactivated only once if 7 days have passed from the expired date.

You need to go to our site and locate and click on “My Account” icon and then login on our website if you are not logged.

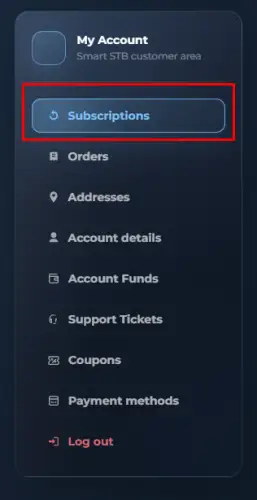
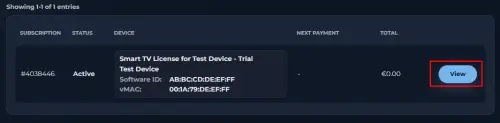
Then locate and choose “My subscriptions” and choose the expired trial license.

Picture below is an example, and not a real device.

Please choose your trial license and click “Renew trial” button.

Picture below is an example, and not a real device.

How to get app license

[et_pb_section fb_built=”1″ _builder_version=”4.17.4″ _module_preset=”default” global_colors_info=”{}”][et_pb_row _builder_version=”4.17.4″ _module_preset=”default” global_colors_info=”{}”][et_pb_column type=”4_4″ _builder_version=”4.17.4″ _module_preset=”default” global_colors_info=”{}”][et_pb_text _builder_version=”4.17.4″ _module_preset=”default” global_colors_info=”{}”]

To get an app Trial just start the app for the first time and agree to the Terms and Services.

More infotmation about how to get trial: https://www.smart-stb.net/knowledge-base/how-to-activate-the-app/

If you want to get paid license please read below.

You need to go to our site and locate and click on “My Account” icon and then login on our website if you are not logged.

Then click on “Smart STB Activation”.

When you choose SMART STB Activation you will see this picture:

Please read the message which was marked with the red rectangle and if you agree with it click on button “I aggree! Show me the activation code.”. After pressed the button, the field with the 10 digit activation code and field in which you can enter your software ID will be showed. We have marked the button with black rectangular (see the picture abowe). When you click on this button you will see this page:

Picture above is an example.

When you see this picture, you need to enter activation code in the app on your device

-or-

you need to enter Software ID in our site.

You can activate via activation code -or- via software ID.
Use this method that is easier for you.

Please note that you can find your Software ID in “Device Info” menu, choose portal menu or in demo portal.

Pictures below are an example and not a real device.

[/et_pb_text][et_pb_image src=”https://www.smart-stb.net/wp-content/uploads/2022/05/activation-device-info.png” title_text=”activation-device info” align=”center” _builder_version=”4.17.4″ _module_preset=”default” global_colors_info=”{}”][/et_pb_image][et_pb_image src=”https://www.smart-stb.net/wp-content/uploads/2022/06/activation-software-id-portal-menu-new-1.png” title_text=”activation-software-id-portal-menu-new-1″ _builder_version=”4.17.4″ _module_preset=”default” global_colors_info=”{}”][/et_pb_image][et_pb_image src=”https://www.smart-stb.net/wp-content/uploads/2022/06/activation_demo_portal_new.png” title_text=”activation_demo_portal_new” _builder_version=”4.17.4″ _module_preset=”default” global_colors_info=”{}”][/et_pb_image][et_pb_text _builder_version=”4.17.4″ _module_preset=”default” global_colors_info=”{}”]

When you entered a valid activation code in app on your device or software ID on activation page on our site you will see something like this on our website and a checkout page will open:

Picture above is an example, and not a real device.

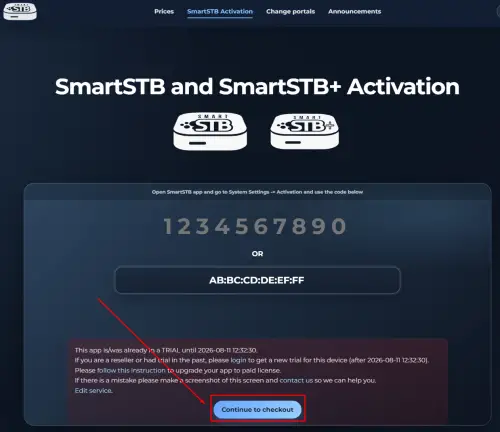
In case you see a picture live above, then the app is active or already active with a license:

To continue to checkout you need to click on “Continue to checkout” button

Picture above is an example, and not a real device.

When you see picture like above, then you need to follow the steps to get paid license. When you proceed with these steps you will be asked to choose which license you want, enter payment method and when you pass trough this steps you will get paid license.

Step 1: Enter your billing address information

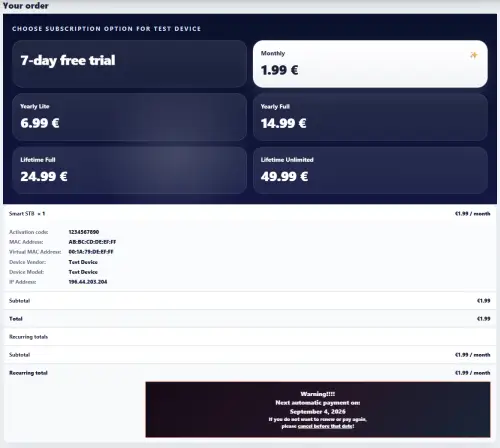
Step 2: Choose the license, you want to purchase

Picture above is an example, and not a real device.

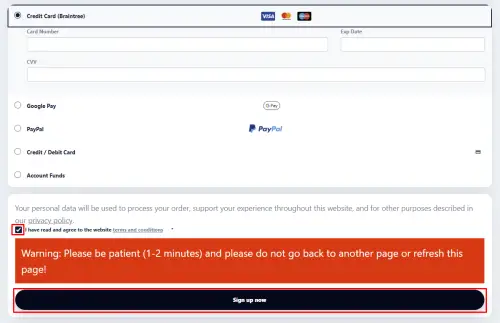
Step 3: Choose payment method, agree with the Terms and conditions and click on “Sign up now” button.

You can choose between Credit Card (Braintree), PayPal, Google Pay and Apple Pay.

If you want to use Google Pay or Apple Pay, please make sure that you have added a valid payment method in Google Pay/Apple Pay.

If you purchase the license from your PC and want to use Apple Pay then you need to use Safari browser on macOS.

Step 4: When you see this picture (see below) you have completed your order and now you have a paid license.

Picture below is an example, and not a real device.

How to upgrade and pay for app license?

[et_pb_section fb_built=”1″ _builder_version=”4.17.3″ _module_preset=”default” global_colors_info=”{}”][et_pb_row _builder_version=”4.17.3″ _module_preset=”default” global_colors_info=”{}”][et_pb_column type=”4_4″ _builder_version=”4.17.3″ _module_preset=”default” global_colors_info=”{}”][et_pb_text _builder_version=”4.17.3″ _module_preset=”default” global_colors_info=”{}”]

How to upgrade the app with paid license:


Important note: if you bought the TV from someone else who used the app in the past, you can get a new app trial from inside of the app (at least 3 months after the last time the app was used)

You need to go to our site and locate and click on “My Account” icon and then login on our website if you are not logged.


  • Open my Subscriptions

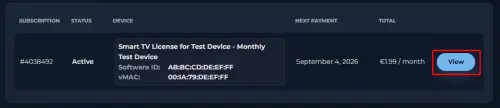
  • Select the app License you want to upgrade to paid license and click on “View” button.

Picture above is an example, and not a real device
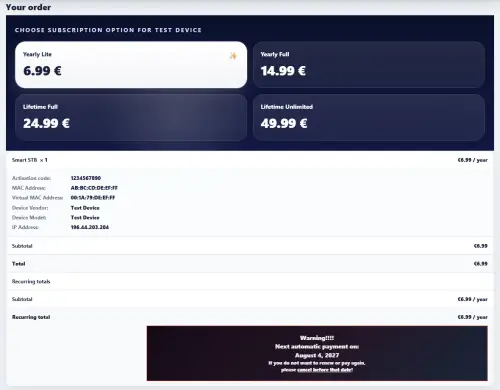
  • Click on the license plan that you want (Annualy Lite/Annualy/Lifetime Lite/Lifetime button) and follow the on-screen instructions (varies by region).

Picture above is an example, and not a real device

Instructions for update license are showed in the pictures below. Please follow the instructions to upgrade your license.

  • Enter billing address information

  • Choose the license, you want to purchase

Picture above is an example, and not a real device
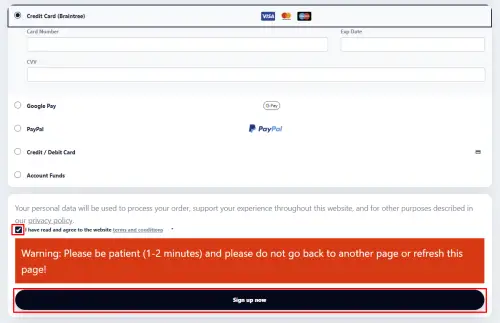
  • Choose payment method, agree with the Terms and conditions and click on “Sign up now” button.

You can choose between Credit Card (Braintree), PayPal, Google Pay and Apple Pay.

If you want to use Google Pay or Apple Pay, please make sure that you have added a valid payment method in Google Pay/Apple Pay.

If you purchase the license from your PC and want to use Apple Pay then you need to use Safari browser on macOS.

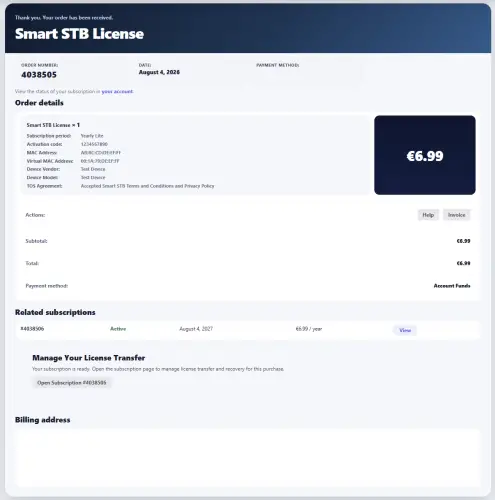
  • If everything is correct you will recieve this picture below. If you see it then you are transfered your license successful.
Picture below is an example, and not a real device

Picture above is an example, and not a real device

How to change the Software ID

[et_pb_section fb_built=”1″ _builder_version=”4.17.3″ _module_preset=”default” global_colors_info=”{}”][et_pb_row _builder_version=”4.17.3″ _module_preset=”default” global_colors_info=”{}”][et_pb_column type=”4_4″ _builder_version=”4.17.3″ _module_preset=”default” global_colors_info=”{}”][et_pb_text _builder_version=”4.17.3″ _module_preset=”default” global_colors_info=”{}”]

This article will show you how to change your licensed Software ID if it has changed for some reason or you bought a new device and want to transfer the license to it.

Please note that Software ID cannot be changed to your old one, this guide will show you how to change the ID in our system to your new one to be able to use your license again

Chaning the Software ID to a custom one is not possible! Software ID is the actual MAC on your Wired LAN interface.

How to change the Software ID:

Start the app, press OK/Center or Arrow keys when you see “Loading Portal” and go to Settings.

[/et_pb_text][et_pb_image src=”https://www.smart-stb.net/wp-content/uploads/2022/04/select-a-portal-for-loading.png” title_text=”select a portal for loading” _builder_version=”4.17.3″ _module_preset=”default” global_colors_info=”{}”][/et_pb_image][et_pb_text _builder_version=”4.17.3″ _module_preset=”default” global_colors_info=”{}”]

Then go to Device Info.

[/et_pb_text][et_pb_image src=”https://www.smart-stb.net/wp-content/uploads/2022/05/Device-Info.png” title_text=”Device Info” _builder_version=”4.17.3″ _module_preset=”default” global_colors_info=”{}”][/et_pb_image][et_pb_text _builder_version=”4.17.3″ _module_preset=”default” global_colors_info=”{}”]

In Subscription it will say Limited Demo. Note the different Software ID (in this example: AB:BC:CD:DE:EF:FF)

[/et_pb_text][et_pb_image src=”https://www.smart-stb.net/wp-content/uploads/2022/05/Device_Info.png” title_text=”Device_Info” _builder_version=”4.17.3″ _module_preset=”default” global_colors_info=”{}”][/et_pb_image][et_pb_text _builder_version=”4.17.3″ _module_preset=”default” global_colors_info=”{}”]

Step 1: You need to go to our site and locate and click on “My Account” icon and then login on our website if you are not logged

Step 2: Open my Subscriptions

Step 3: Find the TV that went in Demo and click “View” button (look at the back of your TV to get the TV make and model):

(Example device, information on above picture is for demonstration purposes, please do NOT enter this on our app and site)

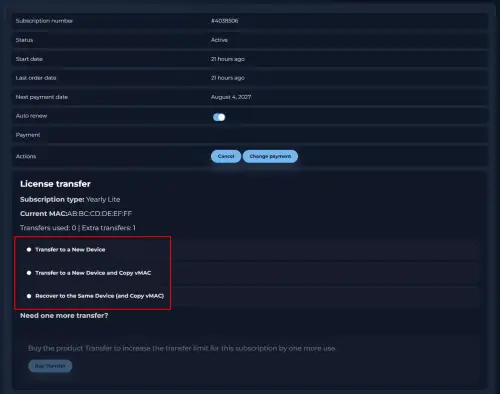
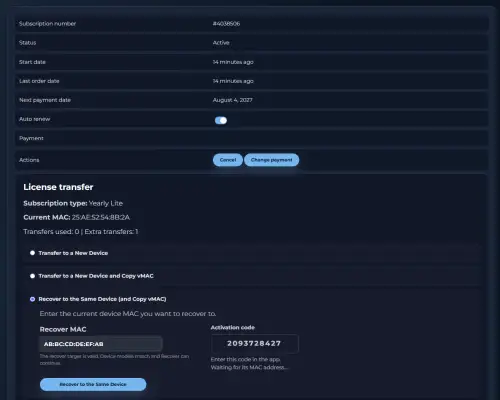
Click your subscription and locate transfer license option. You can choose from three options to transfer:

    • Transfer to New Device;
    • Transfer to a New Device and Copy vMAC*
    • Transfer to the Same Device (and Copy vMAC)**.

Choose transfer license method that you desire and follow the instructions.

(Example software ID, information on above pictures is for demonstration purposes, please do not enter the software ID our website)

* Use this options if you are transferring your license to a new device, but you wish to keep your old Virtual MAC so you won’t lose your subscription with your IPTV provider, otherwise please use the “Transfer to a New Device” to discard your old Virtual MAC and take the new one.

** Use this option if for some reason your device has been reset (e.g. it has its motherboard replaced and you got a new Software ID), by using this option you will keep your old Virtual MAC and the transfer won’t be counted as such.

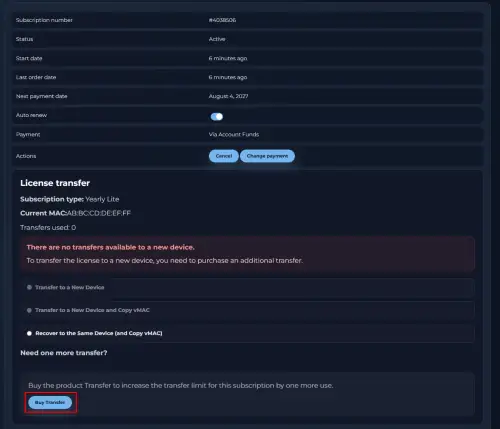
In case you are seeing a picture like this:

(Example software ID, information on above pictures is for demonstration purposes, please do not enter the software ID our website)

This means that you don’t have available transfer to a new device and in order to transfer your license to a new device, you need to purchase an extra transfer by clicking on “Buy Transfer” button.

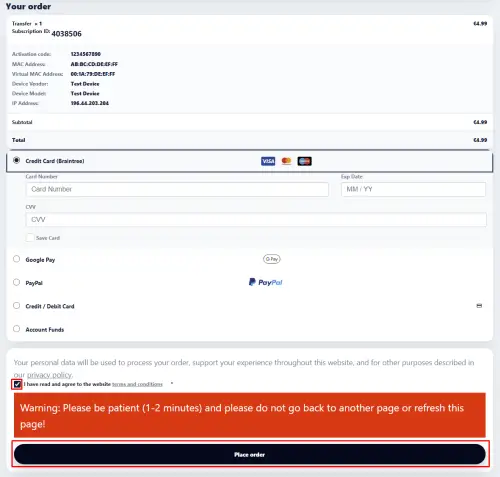
Once you click on “Buy an extra transfer”, you will open the checkout page. On this page, you need to enter your billing address information and choose which payment method to use.

(Example, information on above pictures is for demonstration purposes, please do NOT enter the activation code on our app or the app’s software ID on our website)

Once you select which payment method to use, you need to agree with the Terms and conditions and click on “Place order” button.

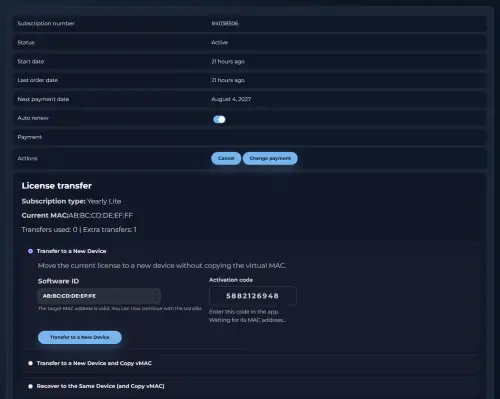
  • If you choose “Transfer to a New Device” option, you need to enter  a software ID in “Software ID” box or the activation code in the app’s Activation page. Wait all information to load and you will see a picture like this:

To complete the license transfer you need to click on “Transfer to a New Device” button.

(Example code, information on above pictures is for demonstration purposes, please do NOT enter the activation code on our app)

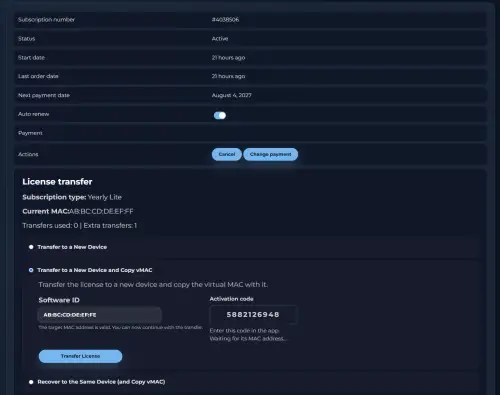
  • If you choose “Transfer to a New Device and Copy vMAC*” option, you need to enter  a software ID in “Software ID” box or the activation code in the app’s Activation page. Wait all information to load and you will see a picture like this:

To complete the license transfer you need to click on “Transfer License” button.

(Example code, information on above pictures is for demonstration purposes, please do NOT enter the activation code on our app)

  • If you choose “Transfer to the Same Device (and Copy vMAC**)”, you need to enter  a software ID in “Software ID” box or the activation code in the app’s Activation page. Wait all information to load and you will see a picture like this:

To complete the license transfer you need to click on “Recover to the Same Device” button.

(Example code, information on above pictures is for demonstration purposes, please do NOT enter the activation code on our app)

[/et_pb_text][/et_pb_column][/et_pb_row][/et_pb_section]
How to cancel (stop paying for the) app license

[et_pb_section fb_built=”1″ _builder_version=”4.17.3″ _module_preset=”default” global_colors_info=”{}” theme_builder_area=”post_content”][et_pb_row _builder_version=”4.17.3″ _module_preset=”default” global_colors_info=”{}” theme_builder_area=”post_content”][et_pb_column type=”4_4″ _builder_version=”4.17.3″ _module_preset=”default” global_colors_info=”{}” theme_builder_area=”post_content”][et_pb_text _builder_version=”4.17.3″ _module_preset=”default” global_colors_info=”{}” theme_builder_area=”post_content”]

How to cancel (stop paying for the) app license:

We are sorry to see you go. Please follow the instructions below to cancel your license. You can resume your license at any time by clicking the Upgrade button when you are ready to use the app again.

  • You need to go to our site and locate and click on “My Account” icon and then login on our website if you are not logged.

  • Open my Subscriptions

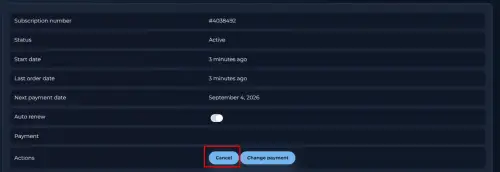
  • Select the app License you want to cancel (only monthly or yearly licenses, lifetime license is valid forever).

(Picture above is an example, and not a real device)
  • Click on the Cancel button and follow the on-screen instructions (varies by region).

Please note that if Cancel button does not exist, it means that the app is pre-paid (or there is only pre-paid option in your region) and will cancel automatically on the Expire Date. As per our TOS this is an effective cancellation, however you can resume at any time.

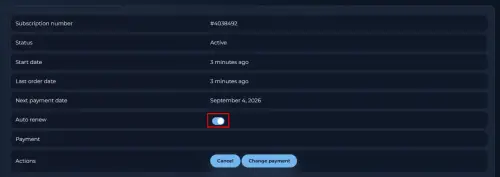
  • If you want to disable the Auto-renew option, you need to click on “Auto-renew” button.

[/et_pb_text][/et_pb_column][/et_pb_row][/et_pb_section]
What are App bundles and how to use them?

[et_pb_section fb_built=”1″ _builder_version=”4.17.3″ _module_preset=”default” global_colors_info=”{}”][et_pb_row _builder_version=”4.17.3″ _module_preset=”default” global_colors_info=”{}”][et_pb_column type=”4_4″ _builder_version=”4.17.3″ _module_preset=”default” global_colors_info=”{}”][et_pb_text _builder_version=”4.21.0″ _module_preset=”default” hover_enabled=”0″ global_colors_info=”{}” sticky_enabled=”0″]

App bundles allow you to use the app on other devices at your home using your main device’s app license.

You need to have all devices you want to link connected at the same network as your main licensed device to make the link.

Please note:

You will need separate (additional) account(s) on your Portal(s) for every device.

Portals  can be changed only from the main licensed device that has a full, lite extra (paid addon) or unlimited license.

Your bundled devices have the portals from main licensed device and can not change Portals.

How to make bundle:

Follow this instruction:

Start the app first from your device that you want to add to bundle (TV, tablet or smartphone) and wait until it loads fully.

Next, start the app on your main licensed device and wait for the “Loading Portal” message to appear. When you see this message (“Loading Portal”) press TV Remote’s Middle or Center key (or touch the screen for mobiel device) to open select portal menu.

[/et_pb_text][et_pb_image src=”https://www.smart-stb.net/wp-content/uploads/2022/04/loading-portal.png” title_text=”loading portal” align=”center” _builder_version=”4.17.3″ _module_preset=”default” global_colors_info=”{}”][/et_pb_image][et_pb_image src=”https://www.smart-stb.net/wp-content/uploads/2022/04/4-remote.png” title_text=”4 remote” align=”center” _builder_version=”4.17.3″ _module_preset=”default” global_colors_info=”{}”][/et_pb_image][et_pb_text _builder_version=”4.21.0″ _module_preset=”default” global_colors_info=”{}”]

When you open this menu (Select portal menu), please go to System settings and then go to Budnle page. If your devices are connected to the same network your main licensed device (TV, smartphone or tablet) will show in the list on your Bundle page.

[/et_pb_text][et_pb_image src=”https://www.smart-stb.net/wp-content/uploads/2022/04/select-a-portal-for-loading.png” title_text=”select a portal for loading” align=”center” _builder_version=”4.17.3″ _module_preset=”default” global_colors_info=”{}”][/et_pb_image][et_pb_image src=”https://www.smart-stb.net/wp-content/uploads/2022/04/system-settings-bundle.png” title_text=”system settings bundle” align=”center” _builder_version=”4.17.3″ _module_preset=”default” global_colors_info=”{}”][/et_pb_image][et_pb_text _builder_version=”4.17.3″ _module_preset=”default” global_colors_info=”{}”]

Here is an example screen of the devices available:

[/et_pb_text][et_pb_image src=”https://www.smart-stb.net/wp-content/uploads/2022/04/bundle.png” title_text=”bundle” align=”center” _builder_version=”4.17.3″ _module_preset=”default” global_colors_info=”{}”][/et_pb_image][et_pb_text _builder_version=”4.17.3″ _module_preset=”default” global_colors_info=”{}”]

Picture above is an example, and not a real device

[/et_pb_text][et_pb_text _builder_version=”4.21.0″ _module_preset=”default” hover_enabled=”0″ global_colors_info=”{}” sticky_enabled=”0″]

1 Full app or unlimited app license (at no extra charge) and Lite lifetime licenses (as a paid addon) can have up to 4 additional devices (Smart TV’s, smartphones, tablets, etc.) bundled (linked for multi screen)

1 Lite lifetime app licenses can have the same bundles as a paid addon.

All devices have different ID’s (Virtual MAC, serial numbers, etc.) however all linked (bundled) devices share the same Portals as main device.

You will need separate (additional) account(s) on your Portal(s) for every device.

Portals  can be changed only from the main licensed device that has a full, lite extra (paid addon) or unlimited license.

Slave devices have the portals from main licensed device and can not change Portals.

[/et_pb_text][/et_pb_column][/et_pb_row][/et_pb_section]
I forgot my email which I registered the app with. How to find it?

[et_pb_section fb_built=”1″ _builder_version=”4.17.1″ _module_preset=”default” global_colors_info=”{}”][et_pb_row _builder_version=”4.17.1″ _module_preset=”default” custom_padding=”24px|||||” global_colors_info=”{}” min_height=”2909.4px”][et_pb_column type=”4_4″ _builder_version=”4.17.1″ _module_preset=”default” global_colors_info=”{}”][et_pb_text _builder_version=”4.21.0″ _module_preset=”default” hover_enabled=”0″ global_colors_info=”{}” sticky_enabled=”0″]

Forgot your email you used to get the app with? No problem. Here is how you can get it.


You need access to your app to do this. It can be from any device (TV, tablet, smartphone) that you bought a license for.
Due to security reasons this feature is not available for additional (extra) bundled devices and provider licensed devices – you need to have access to your main end-user licensed devices.
Make sure you have the app installed on the device and fully started atleast once in the past 6 months.

To get the app’s registered Email (assuming this app has been registered):

    • Press OK/Center key on the Remote as soon as you see Loading Portal.
    • On some TV Remotes you need to press any of the ARROW keys instead of Center key.

[/et_pb_text][et_pb_image src=”https://www.smart-stb.net/wp-content/uploads/2022/04/loading-portal.png” title_text=”loading portal” align=”center” _builder_version=”4.17.3″ _module_preset=”default” global_colors_info=”{}”][/et_pb_image][et_pb_image src=”https://www.smart-stb.net/wp-content/uploads/2022/04/TV-remotes.png” title_text=”TV remotes” align=”center” _builder_version=”4.17.3″ _module_preset=”default” global_colors_info=”{}”][/et_pb_image][et_pb_text _builder_version=”4.17.3″ _module_preset=”default” global_colors_info=”{}”]

    • Go to System Settings

[/et_pb_text][et_pb_image src=”https://www.smart-stb.net/wp-content/uploads/2022/05/system_settings_new.png” title_text=”system_settings_new” _builder_version=”4.17.3″ _module_preset=”default” global_colors_info=”{}”][/et_pb_image][et_pb_text _builder_version=”4.17.3″ _module_preset=”default” global_colors_info=”{}”]

    • Go to Device Info.

[/et_pb_text][et_pb_image src=”https://www.smart-stb.net/wp-content/uploads/2022/05/selected_device_info.png” title_text=”selected_device_info” _builder_version=”4.17.3″ _module_preset=”default” global_colors_info=”{}”][/et_pb_image][et_pb_text _builder_version=”4.17.3″ _module_preset=”default” global_colors_info=”{}”]

  • Press the Yellow color key (F2 on some remotes) on  your TV remote
  • You will get your Email address in the next window!
  • If your app is not registered it will show “Not registered”

[/et_pb_text][et_pb_image src=”https://www.smart-stb.net/wp-content/uploads/2022/05/device_info_email.png” title_text=”device_info_email” _builder_version=”4.17.3″ _module_preset=”default” global_colors_info=”{}”][/et_pb_image][et_pb_text _builder_version=”4.17.3″ _module_preset=”default” global_colors_info=”{}”]

Picture above is an example, and not a real device

[/et_pb_text][et_pb_text _builder_version=”4.21.0″ _module_preset=”default” hover_enabled=”0″ global_colors_info=”{}” sticky_enabled=”0″]

To do a password reset, you need access to you email. Click here for password reset page.

Once you reset your password, you can access your app thru the web panel, change your Portal and upgrade your license.

[/et_pb_text][/et_pb_column][/et_pb_row][/et_pb_section]
How to use Smart STB on Handheld (phone, tablet, etc.)

[et_pb_section fb_built=”1″ _builder_version=”4.17.1″ _module_preset=”default” global_colors_info=”{}”][et_pb_row _builder_version=”4.17.4″ _module_preset=”default” global_colors_info=”{}”][et_pb_column type=”4_4″ _builder_version=”4.17.4″ _module_preset=”default” global_colors_info=”{}”][et_pb_text _builder_version=”4.17.4″ _module_preset=”default” global_colors_info=”{}”]

On first start you will get info screen

[/et_pb_text][et_pb_image src=”https://www.smart-stb.net/wp-content/uploads/2022/05/navigation.png” title_text=”navigation” _builder_version=”4.17.4″ _module_preset=”default” global_colors_info=”{}”][/et_pb_image][et_pb_text _builder_version=”4.17.4″ _module_preset=”default” global_colors_info=”{}”]

You can also navigate with the virtual remote inside the app, see below for info.

When you press virtual OK key on bottom right part of the device screen, you will get feedback with a small OK icon (see below)

[/et_pb_text][et_pb_image src=”https://www.smart-stb.net/wp-content/uploads/2022/06/OK_option_new_1.png” title_text=”OK_option_new_1″ _builder_version=”4.17.4″ _module_preset=”default” hover_enabled=”0″ global_colors_info=”{}” sticky_enabled=”0″][/et_pb_image][et_pb_text _builder_version=”4.17.4″ _module_preset=”default” global_colors_info=”{}”]

Press and hold on bottom right part of device screen to get small virtual remote which looks like this.

[/et_pb_text][et_pb_image src=”https://www.smart-stb.net/wp-content/uploads/2022/05/OK-menu.png” title_text=”OK menu” _builder_version=”4.17.4″ _module_preset=”default” global_colors_info=”{}”][/et_pb_image][et_pb_text _builder_version=”4.17.4″ _module_preset=”default” global_colors_info=”{}”]

Tap on Keyboard icon between Right Arrow key and Down Arrow Key to get more keys on the screen.

[/et_pb_text][et_pb_image src=”https://www.smart-stb.net/wp-content/uploads/2022/05/OK-menu-advanced.png” title_text=”OK menu advanced” _builder_version=”4.17.4″ _module_preset=”default” global_colors_info=”{}”][/et_pb_image][/et_pb_column][/et_pb_row][/et_pb_section]