IMPORTANT NOTE: The app does not come with any TV Services and we do not offer Portals or Playlists! You need to have your own Portal or a m3u Playlist to use with our app!
You need to configure the app to get TV channels and content.
If you use a few devices with one license (bundles) then you can change the portals only from your main licensed device and have them load on your bundled devices next time you start the app.
Once you have your own Portal or m3u Playlist to use with the app, please read below.
How to quickly change the Portal from our website (via QR code)
You need to scan the QR code with your phone or tablet
– or –
enter the settings code (in this example 1234567890) in the Change Portals page that you can get by starting the app and waiting for it to load the Portal, see example below.
Or you can preess OK/Center key while seeing Loading Portal and get the QR code in the Portals menu, see example below.
You can also see the Settings code (in this example is 1234567890) that you can enter in the Change Portals page in case you can’t scan the QR code.
TO SAVE: Press the GREEN (F2 on some Remotes) KEY. In case you don’t have an F2 or Green Colored Key on your Remote, please press the BACK or RETURN Key (depending on remote and TV model) and then press OK/Center for confirmation.
7. After you enter your Portal or m3u Playlist URL make sure to select it as Default portal so it will load next time the app starts.
My app was reset. Now what? How to add your Portals again.
In case your app did got reset, then you need to put back your Portals. By resetting the app your subscription with your Provider is usually not lost, however this is not always guaranteed.
Start the app, press OK/Center or Arrow keys when you see “Loading Portal” and go to Settings.
Press the GREEN (F2 on some Remotes) KEY. In case you don’t have an F2 or Green Colored Key on your Remote, please press the BACK or RETURN Key (depending on remote and TV model) and then press OK/Center for confirmation.
Please check if your app did revert to Demo (for example, due to missed monthly payment, a hard reset of the TV, change of the Software ID, change of the TV, change of network/routers/locations of the TV, change in Region, etc.)
In case your is paid but you still see limited demo, please read below.
Start the app, press OK/Center or Arrow keys when you see “Loading Portal” and go to Settings.
Check the Status – if it’s On hold (Suspended or Terminated) (depending on region) – then it’s most likely that we did not received your Payment in time.
(In the image it’s displayed what will look like if you have an unpaid invoice – information is for demonstration purposes and its fake)
How to fix this problem:
Please log in to your PayPal account and cancel all automated payments to our company. And then please go to our website and resubscribe, make sure you are using Paypal Express as payment method. This will solve the problems with delayed and/or incorrectly accounted payments.
In case some payments already went out during that time – please give us all relevant Transaction ID’s (you can find them in the Paypal receipt emails and inside the Details of the actual Payment). Please do NOT upload images of the Transaction ID’s but rather please paste them in clear text as images and pictures usually don’t come in clear.
My app shows Limited Demo but Payment is made. Did my Software ID change? How to check:
Login to your account. Select User Icon and then select My Licenses.
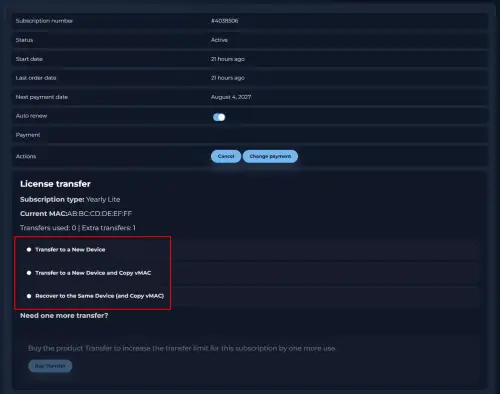
* Use this options if you are transferring your license to a new device, but you wish to keep your old Virtual MAC so you won’t lose your subscription with your IPTV provider, otherwise please use the “Transfer to a New Device” to discard your old Virtual MAC and take the new one.
** Use this option if for some reason your device has been reset (e.g. it has its motherboard replaced and you got a new Software ID), by using this option you will keep your old Virtual MAC and the transfer won’t be counted as such.
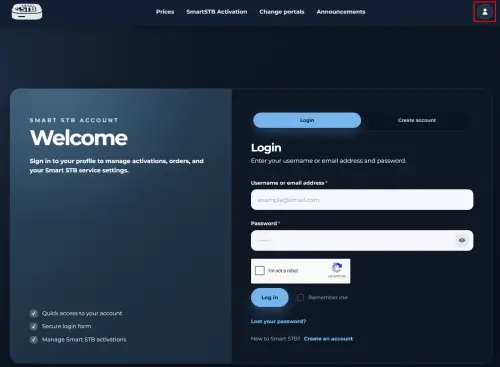
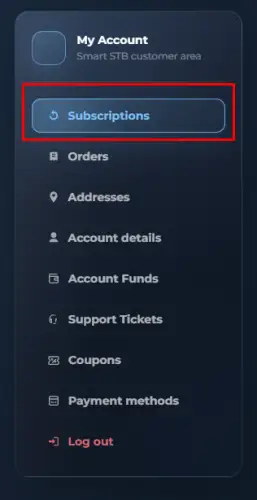
Step 1: You need to go to our site and locate and click on “My Account” icon and then login on our website if you are not logged
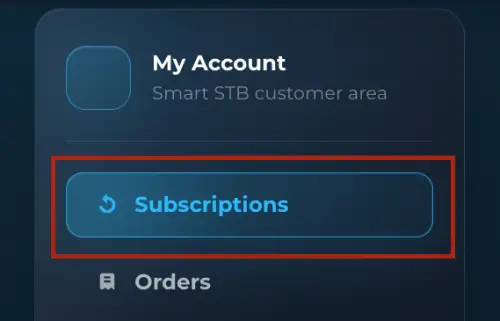
Step 2: Open my Subscriptions
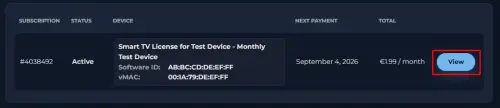
Step 3: Find the TV that went in Demo and click “View” button (look at the back of your TV to get the TV make and model):
(Example device, information on above picture is for demonstration purposes, please do NOT enter this on our app and site)
Tip: use the search feature to find your device, useful if you have many devices in your account.
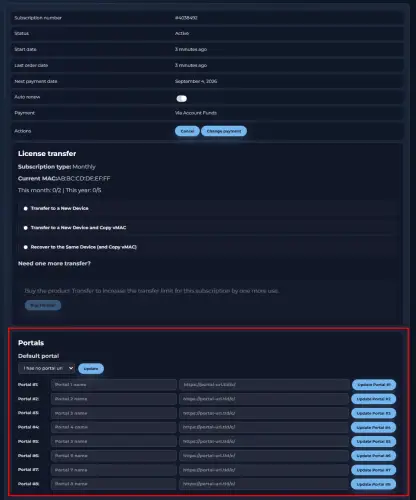
Step 4: Once you click on “View” button, you will see this:
(Example software ID, information on above pictures is for demonstration purposes, please do not enter the software ID our website)
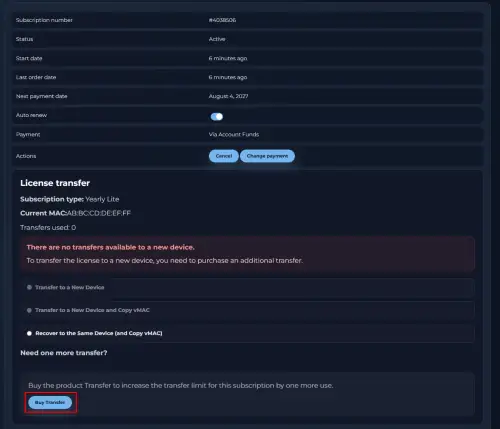
In case you are seeing a picture like this:
(Example software ID, information on above pictures is for demonstration purposes, please do not enter the software ID our website)
This means that you don’t have available transfer to a new device and in order to transfer your license to a new device, you need to purchase an extra transfer by clicking on “Buy Transfer” button.
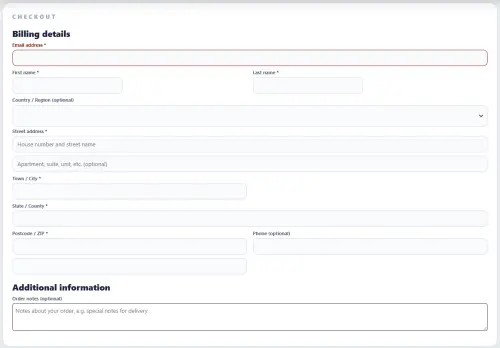
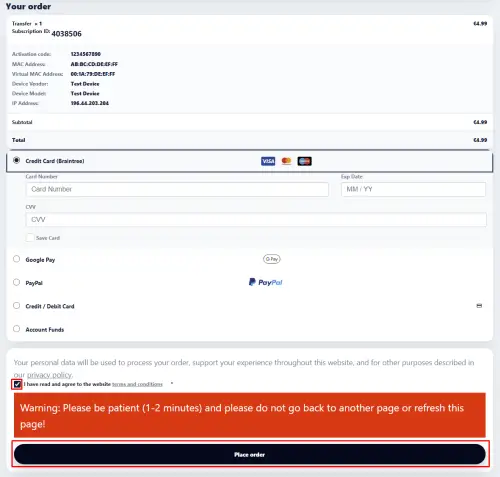
Once you click on “Buy an extra transfer”, you will open the checkout page. On this page, you need to enter your billing address information and choose which payment method to use.
Once you select which payment method to use, you need to agree with the Terms and conditions and click on “Place order” button.
Step3: Chose which
Transfer to a New Device;
Transfer to a New Device and Copy vMAC*
Transfer to the Same Device (and Copy vMAC**)
* Use this options if you are transferring your license to a new device, but you wish to keep your old Virtual MAC so you won’t lose your subscription with your IPTV provider, otherwise please use the “Transfer to a New Device” to discard your old Virtual MAC and take the new one.
** Use this option if for some reason your device has been reset (e.g. it has its motherboard replaced and you got a new Software ID), by using this option you will keep your old Virtual MAC and the transfer won’t be counted as such.
Transferring to the same TV (license recovery) is unlimited, fair use applies.
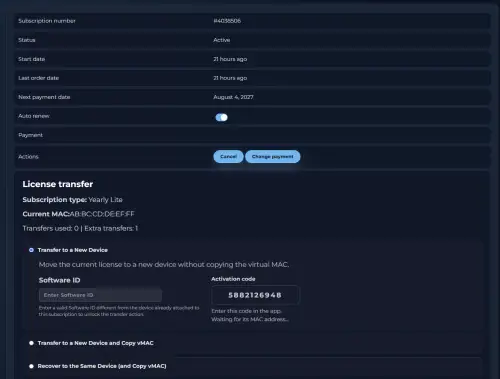
Transfer to a New Device;
(Example software ID, information on above pictures is for demonstration purposes, please do not enter the software ID our website)
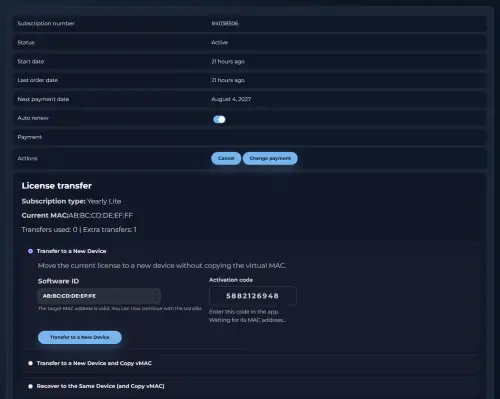
Once you enter a software ID in “Software ID” box or the activation code in the app’s Activation page, you will see a picture like this:
To complete the license transfer you need to click on “Transfer to a New Device” button.
(Example software ID, information on above pictures is for demonstration purposes, please do not enter the software ID our website)
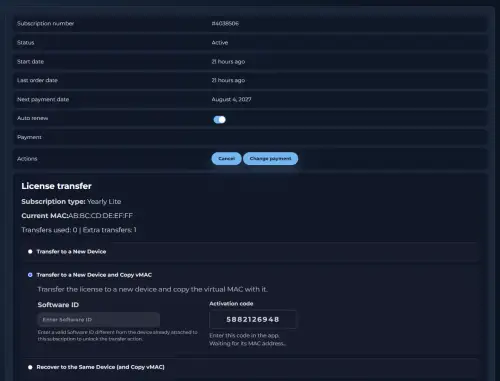
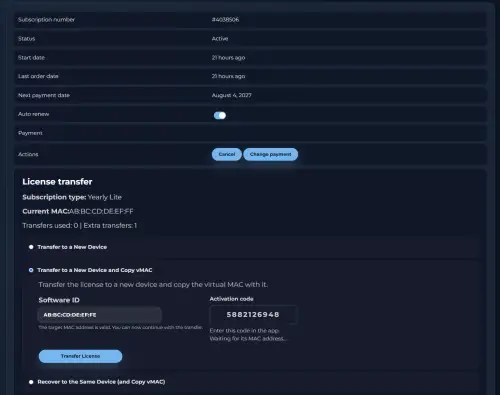
Transfer to a New Device and Copy vMAC*;
* Use this options if you are transferring your license to a new device, but you wish to keep your old Virtual MAC so you won’t lose your subscription with your IPTV provider, otherwise please use the “Transfer to a New Device” to discard your old Virtual MAC and take the new one.
Once you enter a software ID in “Software ID” box or the activation code in the app’s Activation page, you will see a picture like this:
To complete the license transfer you need to click on “Transfer License” button.
(Example code, information on above pictures is for demonstration purposes, please do NOT enter the activation code on our app)
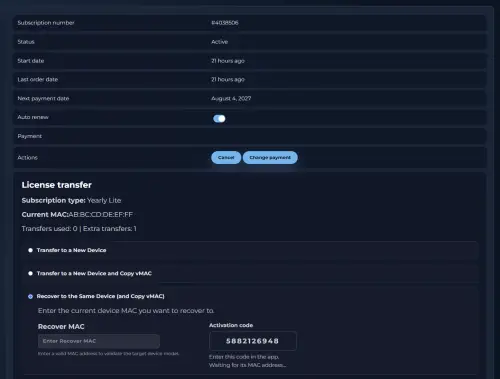
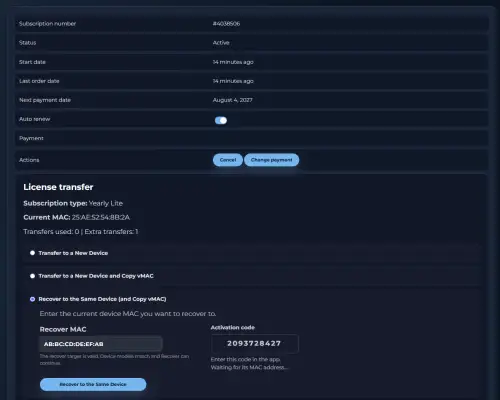
Transfer to the Same Device (and Copy vMAC**).
** Use this option if for some reason your device has been reset (e.g. it has its motherboard replaced and you got a new Software ID), by using this option you will keep your old Virtual MAC and the transfer won’t be counted as such.
Once you enter a software ID in “Software ID” box or the activation code in the app’s Activation page, you will see a picture like this:
To complete the license transfer you need to click on “Recover to the Same Device” button.
(Example code, information on above pictures is for demonstration purposes, please do NOT enter the activation code on our app)
Please save or write down this code so you can enter it later on your smart TV.
Step 5: Open the app from your new TV device and wait this message to appear:
Prepare to enter the activation code. Start the app on your TV and wait for the “Loading Portal” message to appear.
Please enter the code from the next step using your TV Remote’s number keys while you see the “Loading Portal” message.
For TV remotes or devices that do not have numbers on the remote control please press the Middle or Center key on your remote to show the app menu. Go to System settings and then go to Activation. Use the software (virtual) keyboard to enter the code.
Some budget and mid-range Smart TV’s made by Samsung, Philips, LG and few others recently got TV OS (Firmware) upgrade which limited video and audio codec support.
Codecs that are officially supported on all devices and all regions are H264 for video and LC-AAC for audio.
This is not caused because of an Smart STB update but because of TV OS (Firmware) update which limitedvideo and audio codec support.
You will need to re-encode (or transcode) some of your video files that can not play on Smart TV’s.
Generally TV’s are limited to playing H264 (and H265 for most 4K TV’s) video with LC-AAC audio.
Please re-encode all video files to H264 with H264 video (not less than 1 mbit and not more than 30 mbit/s) and LC-AAC audio (44.1/48 KHz at 128 kbit/s recommended).
Many Portals have encoded movies and TV series correctly at H264 video but use AC3, DTS, E-AC or other audio codecs that are now disabled on all budget and many mid-class devices.
If your videos are in H264 you only need to only re-encode the audio to LC-AAC (which is usually very fast)
This way you will be able to reach all devices supported by Smart STB and avoid problems in the future.
Your Provider is running very old version of the Portal. For example 4.8.xx. The app is tested and working with 4.9.x and 5.x versions up to latest version
–or–
Your Provier’s Portal settings have changed due to Upgrade from their side.
Sometimes Providers need to adjust their updated Portal to allow non-MAG devices to use it. –or–
Example Portal URL are like http://some-provider.tld/stalker_portal/c/index.html http://box.some-provider.tld/c/index.html
Wrong Portal URL looks like http://box.some-provider.tld/ http://stb.some-provider.tld/ http://mag.box.some-provider.tld/
that redirects to http://some-provider.tld/stalker_portal/c/index.html
You can choose your virtul MAC address to be normalized( default), normalized (2-7) and custom (edit vMAC). You can also choose “Custom (edit vMAC and Serial)” if you want to change your “Serial number”.
Now you can also choose which device to be emulated: MAG 250, MAG 322 or MAG 520.
Please check your network or contact your ISP or service provider. It’s worth unplugging your TV and your router from the power for a few minutes and then trying again.
Getting Please contact your provider to register this device message?
[/et_pb_text][et_pb_image src=”https://www.smart-stb.net/wp-content/uploads/2022/04/Contact-provider-to-register-this-device.png” _builder_version=”4.17.3″ _module_preset=”default” title_text=”Contact provider to register this device” hover_enabled=”0″ sticky_enabled=”0″][/et_pb_image][et_pb_text _builder_version=”4.17.3″ _module_preset=”default” hover_enabled=”0″ sticky_enabled=”0″]
There are few reasons for this to happen.
Most popular ones:
You use other apps that give out the same Virtual MAC to your Portal
Someone else used the same Virtual MAC thru another application or tool
Provider did not read authentication data properly.
Your IPTV Provider or Portal admin needs to DELETE and RE-CREATE your account on their system. Please login quickly after account creation to ensure your Portal account is connected to our app and not any other app or tool.
To offer best security please do NOT use other apps with the same Virtual MAC on the same Portal.
We do not offer or operate IPTV access, channels or providers.
This article will show you how to reset your app if you have some issues mostly caused by an old cache stored by the app and your device. This procedure should help you for most of the cases, but please don’t do this procedure unless you were instructed to do it!
Start the app, press OK/Center or Arrow keys when you see “Loading Portal” and go to Settings.